Recipes             Menus              Entertaining             About

Starred Recipes

3 Stars - A Family Favorite
2 Stars - Really Good, Will Make Again
1 Star - Good Recipe, Probably Won't Make Again

September 27, 2012

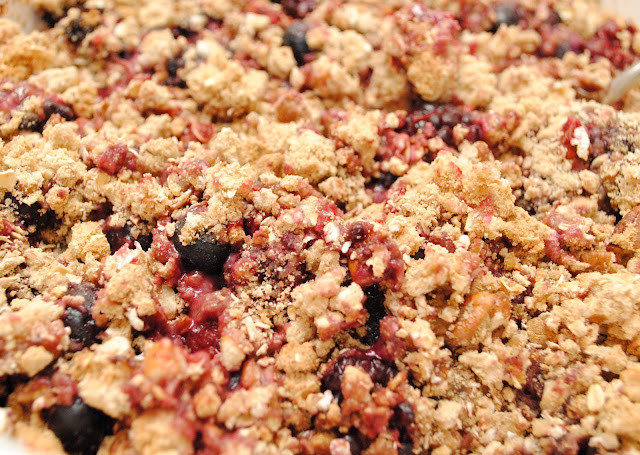
Berry Crisp with Maple-Pecan Topping

Berry Crisp with Maple-Pecan Topping

Last weekend we were invited to a neighborhood gathering at our neighbor's gorgeous horse stables behind the ravine.  The theme was "Welcome to Fall".  We had hot apple cider and everyone brought a fall treat.  We played games, fed the horses carrots, and caught up with our neighbors. 
A fun afternoon!

Brennan and I decided to make this yummy sounding cobbler from this month's Vegetarian Times. 
The original recipe is a Blackberry Cobbler, but Brennan is not a huge blackberry fan because the seeds get stuck in his teeth.  I hear ya.

So we decided to do a mixed berry cobbler.  We used (thawed) frozen berries we had on-hand, but you could also use fresh berries.

What I love about this cobbler recipe is that it isn't overly sweet - it's really tart, with a hint of sweetness.  It was perfect!

We started by whisking together maple syrup and Balsamic vinegar, then tossing the mixture with our berries.


Then we tossed the berries again with a little sugar, flour and salt and poured it in our sprayed baking dish.


Next we made a topping with flour, maple syrup, rolled oats, chopped pecans, brown sugar and a little oil.  We crumbled it with our fingers and then arranged it over the berries.

We baked the cobbler for 35 minutes at 350* until the berries were bubbling and the cobbler topping was light brown.

We took it piping hot to the barn and shared it with our neighbors!


Delicious!

Double click to print as a 5x7 recipe card.

Enjoy!

September 5, 2012

Watermelon Salad with Jalapeño and Lime

Watermelon Salad with Jalapeño and Lime
 
I saw this salad in the Vegetarian Times Farmer's Market Cookbook and I've been meaning to try it all summer.
We love sweet watermelon and I almost always have some cut up in the fridge that we eat at most meals.
 
This recipe can be made ahead of time or right before serving.
 
You whisk together lime juice, lime zest, and olive oil and pour it over 3 cups of cubed watermelon.
Cover and refrigerate until ready to use.

 
When you're ready to serve, place some jalapeño rings in each serving dish and mound watermelon on top.

The original recipe calls for garnishing with sea salt, black sesame seeds, and thinly sliced basil.
We served ours without the garnish, but I think the black seeds and basil would make it extra pretty.
 
It's a zesty, only hint of hot at the very end, version of plain watermelon.
I like it, but don't think the oil was necessary at all.
I think watermelon by itself, or with a little lime and lime zest, works just fine!


Double click to print as a 5x7 recipe card.
 
Enjoy!
 

Nishime Vegetables

Nishime Cooked Vegetables
 
 
Nishime (Ni-SHEE-may) is a style of cooking vegetables that allows the veggies to cook in their own juices, with very little water.  My understanding is that Nishime typically means "Waterless Cooking".  I have read about this style of cooking in a number of places and decided to try it out.
 
You can use just about any vegetables in Nishime, but the ones I see recommended the most often are in the Leafy, Root, and Round vegetable categories.
 
Leafy Suggestions:
Bok Choy, Cabbage, Turnip or Mustard Greens, Kale, Leeks
 
Root Suggestions:
Burdock, Carrots, Daikon Radish, Other Radishes, Parsnips
 
Round Vegetables:
Any Squash or Pumpkin, Broccoli, Brussels Sprouts, Cauliflower, Rutabaga, Turnips, Shiitakes
 
 
The suggestion I saw most commonly for Nishime is to choose 3 vegetables to cook together.
 
Last night I cooked Napa Cabbage, Daikon Radish, and Acorn Squash - and it was a hit!
 
I will certainly use this style of cooking regularly!
 
Every recipe I read for Nishime Vegetables included a piece of Kombu sea vegetable.
I never did get a reason for why it's important, but I figured it was so I purchased Eden brand Kombu at my local natural foods store.  It should last me quite a while!
 
 
I placed a piece of Kombu in my pot and barely covered the bottom of the pot with water.
Some directions say no more than 1/4 inch of water.  Just enough to barely cover the bottom.


Then I layered my three vegetables on top of the kombu.
The fastest cooking is placed on the bottom, and the longest cooking is placed at the top.
So I placed the Napa Cabbage, then the Daikon, then the Acorn Squash.
 
(I'll use larger chunks of Napa next time)

I sprinkled a little sea salt on top and covered the pot, bringing the vegetables to a boil.
Then (without lifting the lid) I reduced it to simmer for 20 minutes.
 
Then I added a few drops of soy sauce and re-covered the pot for 5 more minutes.

 
And the vegetables were done!
I understand that if there is liquid in the bottom of the pot, then I may have started with too much to begin with.  I'll reduce my water even more next time.
 
Drain and serve.

 
Very much like steaming, the vegetables were sweet and thoroughly cooked and had a comforting feel to them.  A great way to serve vegetables!

 
Double click to print as a 5x7 recipe card.
 
 
どうぞめしあがれ (douzo meshiagare)
(Japanese for Bon Appetit!)


September 1, 2012

Black Bean and Rice Salad

Black Bean and Rice Salad
 
Last week I had friends over and served some light southwestern-y style snacks.
I felt like I didn't have quite enough, so I decided to make a rice salad to go with it.
I used what I had on hand, then topped it with a vinaigrette and it was great!
 
I had leftover brown rice so started with that, heating it up just a bit in the microwave to take off the chill.
Then I rinsed & drained a can of black beans and a can of corn and combined with the rice.
I added a chopped scallion and chopped fresh cilantro.
 
I topped the salad with Honey Lime Vinaigrette that Sandy shared with me.  I had not made it before, but it was really great - and a perfect complement to this rice/bean salad.  I have learned a lot from Sandy during her cooking classes - and I now firmly believe everything tastes better with fresh citrus and herbs!
 
The salad disappeared. 
Brennan even had 3 helpings.


Double click to print as 5x7 recipe cards.


Buen Provecho!


Sleepy Lettuce Soup

Sleepy Lettuce Soup
 
Gillian McKeith shares lots of health benefits to each of her recipes.  I won't go into all the reasons this soup is so healthy (you can read all about it in You Are What You Eat), but I can tell you we all really liked this soup.
 
It's really rich and creamy.
No one could believe there wasn't cream in this recipe when we played our regular game of "can you tell what the ingredients are?" at dinner.
 
I froze half of this soup and pulled it out the other night for a second dinner. 
David and I liked it so much the boys didn't get a helping that second night.
 
This is really "Potato Soup with Lettuce" in my mind.
 
Start by heating olive oil in a soup pot and cooking garlic and onion for a few minutes.
Add in peeled and chopped potatoes and let the vegetables cook a few more minutes.


Then add in water, vegetable bouillon, and oatmeal.  Yes, oatmeal.  The original recipe called for 1/2 c of millet, but I didn't have millet, so I went with plain oatmeal and it worked beautifully.
 
I brought the soup to a boil, then let it simmer for 15 minutes.


Then I added in romaine lettuce and let it cook for a couple of minutes.

Then used my handheld blender to blend it well.
You could also transfer the slightly cooled soup to a blender or food processor, then return it to the soup pot if you don't have a Smart Stick.
 
Add chopped parsley or chives and blend again.


Reheat, if necessary, and serve garnished with raw nuts or chopped parsley.

Creamy, rich, and subtle.
A delicious soup!


Double click to print as a 5x7 recipe card.
 
Enjoy!
 

Lime-Marinated White Bean Salad

 
Lime-Marinated White Bean Salad
 
This delicious salad recipe comes from Robin Robertson's Vegan Fire and Spice cookbook that I reference often.
 
This recipe is Peruvian and is normally made the exact same way, but with scallops or white fish in place of the white beans for a ceviche salad.  I'm not a big ceviche fan (raw fish "cooking" in lime), but I did like this salad quite a bit.
 
You start by rinsing and draining well a can of white beans.  I used white cannellini beans.
Toss the beans with lime juice, salt and cayenne.  Cover and refrigerate 1 hour.
 
Make up a dressing by combining parsley, scallion, capers, and olive oil.
If you want to use tomato as well, add in 1 chopped tomato at this point.
 
Place salad greens in a serving bowl, or on individual salad plates.
Top with un-drained marinated beans, and then drizzle the dressing on top.


Tangy, a touch spicy, fresh and delicious.
This salad disappeared quickly with the rest of our dinner!

 
Double click to print as a 5x7 recipe card.
 
Buen Provecho!